Showing posts with label distress inks. Show all posts

Thursday, 23 December 2021

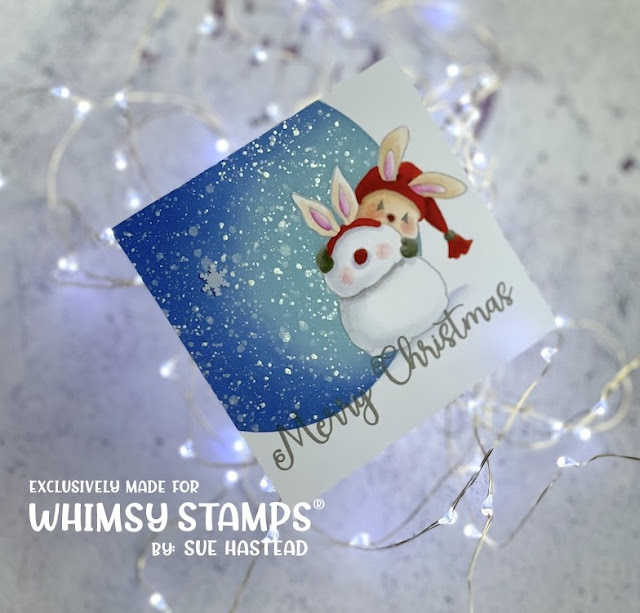
Bunny Winter Holiday - Whimsy Stamps

 Hello everyone,

Sue here today!

Is n't the month flying away!  I swear time is speeding up - or perhaps I'm just getting old! /-:

Today's cards are a couple of cute one layer makes made with Whimsy Stamps
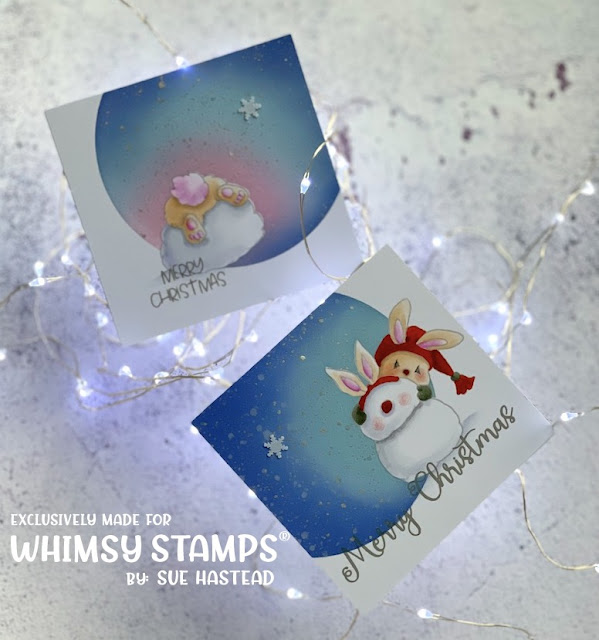
I stamped and then masked the bunny images and then applied a circular aperture mask before blending Distress Oxide Ink over my card.

I then removed the masks and coloured the Christmas Bunnies with Copics.

I stamped the Merry Christmas Sentiments in grey ink.

I then trimmed the card so that the circle was over to one corner of the design.  The finished cards measure about 8cm x 8cm so they are fairly small but VERY cute!
Ingredients from Dies To Die For

Thank you for popping by today, look after yourselves - things aren't going well again!  This flippin' virus is a horror show!

from Sue...xxx

*NEW Bunny Winter Holiday Clear Stamps - Whimsy Stamps *NEW Sentiment Assortment - Merry Christmas Clear Stamps - Whimsy Stamps


Pink - RV04, RV52, RV0000
Reds - E19, E09, E08, R08
Greens - BG99, BG96, BG93
Bunnies - E53, E51, E50
Snow - BV31, C0, C00 Colourless Blender

Other Ingredients
Archival Ink Pad in Shadow Grey
Blueprint Sketch, Tumbled Glass, Spun Sugar
Kutetake Tansai Gambi Starry Colours Paints
Gemini Jnr Die Cutting Machine


Thursday, 24 January 2019

A boy's (and girl's)! dream!...

Happy Thursday friends!


It's Sue here today with more gorgeous goodies from

new release!


Prepare to have your hearts well and truly stolen! - especially if you are the Mother of boys!!!...and girls to be honest!

This card features two items from the new release - 
and

To make this card I sprayed white card with Distress Resist Spray and once it was dry, blended over it with Cracked Pistachio, Blueprint Sketch, Mermaid Lagoon and Black Soot Distress Oxides.  Then I die cut the card with the Wonky Window 1 Die

Then I splattered a piece of black card with white acrylic ink and also die cut that with Wonky Window 1 Die, I also die cut a teeny tiny star!

Then I stamped and coloured 
 A Boy's Dream Clear Stamp Set by Dustin Pike with Copics, and then cut the images out.

I stamped the sentiment and heat embossed it in white and assembled the card design as shown.

The space ship is fixed to the card with a Mini Action Wobble Spring and it really does wobble when you touch it!

Thank you so much for popping by!


Be sure to pop to have a look around our 
Dies To Die For Blog
to see the gorgeous DT creations and then to 
to engage in some essential retail therapy!

love from Sue...xxx

Thursday, 17 January 2019

Pretty in Plaid...

Hello everyone!

It's Sue here today with probably my favourite of the cards I've made recently to show off the 
Whimsy Stamps 
new release goodies!
I have used the beautiful background stamp
and

To make my card I stamped the Buffalo Plaid Background Rubber Cling Stamp with an embossing pad and heat embossed it in white (The white heat embossed ink resists the colour from the Distress Inks).

Then I blended Distress Inks on top of the embossed plaid background - I used Evergreen Bough, Worn Lipstick, Shaded Lilac and Scattered Straw which are quite delicate and look gorgeous together.

I used two square dies together to die cut a white frame and fixed the frame to the background.

Next I die cut white card with the Thanks Word with Shadows Die Set and blended Evergreen Bough Distress Ink over the word thanks.  I fixed that to the stitched edged die cut shadow and then fixed the die cuts to the bottom right hand side of the card design as shown.

Finally I added some glitter dots to the card design in similar colours to the Distress Ink.
I think this is just so pretty and delicate and is an effect I will definitely use again!

Thank you so much for popping by!


Be sure to have a look around our Dies To Die For blog to look at the gorgeous DT creations there and then to 

to engage in some essential retail therapy!

love from Sue...xxx

Thursday, 25 October 2018

Rocket Man...

Hello friends, 
It's Sue here today with some space age gorgeousness from Gerda Steiner.
Ingredients
Black Card
Distress Ink Pads - Worn Lipstick, Peacock Feathers, Chipped Sapphire and Black Soot
White Acylic Paint
White Brilliance Ink Pad
Copic Markers
Skin E04, E11, E01, E000
Hair E41, E43, E44
Red R29, R24, R14
Blue/Green BG57, BG53, BG11


Be sure to have a look around our 
Dies To Die For Blog
to see the gorgeous DT creations here and pop to then to 
Dies To Die For
to engage in some essential retail therapy!

Thank you for popping by,
Happy creating! 
love from
Sue...xxx
My space card is one of a set of three I made for Making Cards magazine.
You can still buy this issue of the magazine by following the link


Tuesday, 14 July 2015

Hello......

Hello...Jane here today with a splodgy make to share,.....I dug out me old Jumbo Abstract Art stamps from MFT for this card....inking with Distress Ink and then spraying the stamp before stamping to get a nice wet splodgy look, I also flicked some wet ink onto the card...then I stamped the Hello with Lawn Fawn Violets ABCs and then a few tiny sequins to add some sparkle..
Have a lovely Day!
xx

Tuesday, 17 February 2015

Little Lady Bug...............

Morning all!
Jane here with a make to share and I have used the cuteness that is Little Lady Bug from LDRS's Saturated Canary range....ain't she a cutie!
I stamped and embossed her then used my Distress Inks to watercolour a background...the sentiment I made using Lawn Fawns Violets ABCs
Hope you  like
Jane
xx

Tuesday, 10 February 2015

Perk Up.....

I love this stamp set sooo much! It MFTs Perk Up and it has loads of coffee based sentiments...I have watercoloured a background again with my distress inks and then stamped and embossed the wee coffee cup and mounted on foam pads...the wee heart is from my stamp stash.
I hope you like!
Jane
xx

Sunday, 15 June 2014

Thanks Teacher.........

Good Morning!! I have been playing with the new Paper Smooches again (loving them) and have made a couple of teacher cards......I used my Distress Inks watered down to make some messy splatters and then stamped and die-cut the pencils...
I hope you like and thanks for popping in!xx

Tuesday, 11 March 2014

Emma again.......

Happy Tuesday folks. DT Linda here, flying in by the seat of my pants today to share my inspirational make with you.  My goodness I've been busy lately, so busy I didn't notice that my lovely teamie Jane had already shared this stamp with you on Sunday....ooops, ah well I think we both did completely different things with her so I hope you'll forgive me.

Anyway, here's the first of them, I hope you like her.  I


Love these gorgeous papers from MME. It was so difficult to cut them because they're double sided and there are one or two sheets where it's just so hard to choose!


I coloured Emma with Distress Ink pads, isn't she just too pretty? She's part of my personal collection because I love her too much to want to part with her :) I used a Spellbinders die to frame her, keeping it pretty simple.


I kept my decorating fairly minimal...for me, as I want anything to draw away from the image too much.

Instead of a sentiment I used one of these lovely wooden embellishments by Prima, this one says it all in one word. I finished the whole with Memory Box's tiny Dancing Butterflies.

Well that's it from me today, I'll be back again same time next week, hope to see you there and whatever you're doing, have fun! 

Linda :) xx


Friday, 20 December 2013

Breeze

Hey Lovelies. Today I wanted to share a pretty card featuring Breeze from Saturated Canary with lush Pion Papers.


She is coloured with distress ink markers. I coloured her to match up these lovely papers - for Mother collection (Blue Pansy) I just love the colours of the papers. I have added lots of girly bits you cant go wrong with lace and pearls can you :)

Have a great day all. Thanks for popping in Jen xxx

Monday, 22 October 2012

MFT Die-namincs Airplane Greetings!

Morning Peeps!!
Its a cold, dark drizzly one here so I decided to brighten it up by having some Save the Date fun!!

The MFT die-namics Airplane Greetings stamp and die set is just perfect for some save the date cards that are a little more fun than the traditional kind! I had so much fun making this card!!
There are so many different greetings in this little set that you are spoilt for choice.....
Die-namics Airplane Greetings Die & Stamp Set

...to make it more personal I just printed out the names of the couple using my word programme on my computer onto some Centura pearl cardstock.

The papers are MME Summer Splash. I cut the little hills by hand, inked them with some Forest Moss distress ink and then popped the top hilly layer up on some Pop up Dots. The paper for the sky was inked around the edges with some faded jeans distress ink.The little heart is a punch from my stash and I used a little thread to attach the banner on with. The plane is popped up too.

Next on my list is a birthday card with this one, its just too much fun not to be played with!!! got to treat myself to a MFT Die-namics cloud trio set first though!! have told hubby its a must on payday!! he he he!!

Have a super monday everyone,
Huge hugs Lou xxx